You can download Windows 10 'Retail' install ISOs from Microsoft and install them using Easy2Boot.
See also this blog post for direct download of many MS ISOs.
1. First go to the MS page and download and run the Download Tool (choose the 32-bit or 64-bit MediaCreationTool.exe, depending on what version of Windows you are currently running).

2. Next select your Edition


See also this blog post for direct download of many MS ISOs.
1. First go to the MS page and download and run the Download Tool (choose the 32-bit or 64-bit MediaCreationTool.exe, depending on what version of Windows you are currently running).

2. Next select your Edition

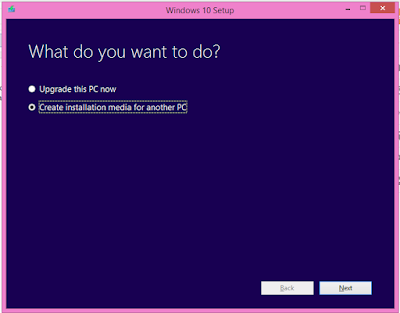
If you want to upgrade the system you are running on, choose the 'Upgrade this PC now' option.
To make an installation ISO file, choose the 2nd option.
It is possible to perform an in-place upgrade using the downloaded ISO file (see below).
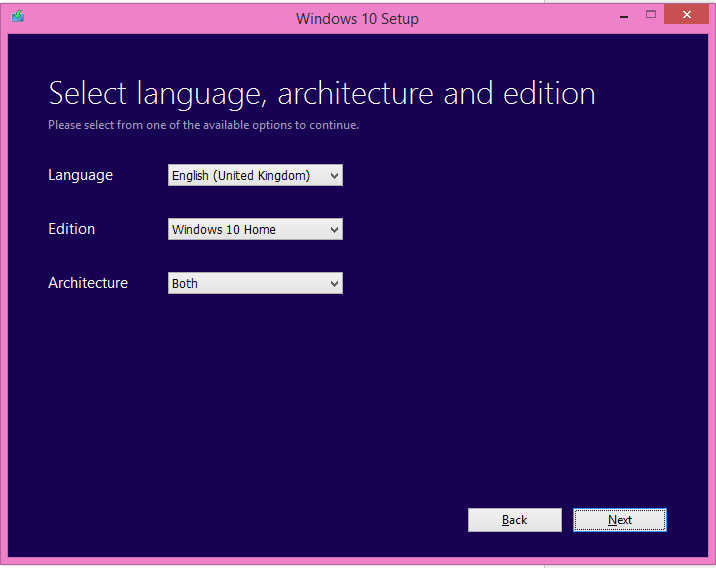
Notice that you can opt to download a combined 32-bit and 64-bit ISO ('both'), but you cannot make a Home+Pro ISO.
3. Tell it that you want an ISO and where to save the file and the download will begin.


4. It seems Microsoft haven't quite got the hang of this 'software thing' yet, and you may find that after you have downloaded the ISO, instead of taking up 2-3GB of disk space, you have lost 10GB+ of disk space. This is because Microsoft have actually used your system to make the ISO and have left behind about 10GB of files in two folders on the root of your Windows hard drive!

If you just downloaded the ISO, you can delete these folders or perform a drive cleanup with all Advanced options ticked. If you have performed an upgrade, you can use drive cleanup to remove these folders but you will not be able to restore your original Win7/8 installation (within 30 days of installing Win10). Drive Cleanup will warn you of this when you use it.
Dual-booting from the ISO
In the case of the dual-boot ISO, this works fine with Easy2Boot. You will be asked to select which version you want first. Note that you can also run a memory test too!

The folder structure of the dual-boot ISO is interesting:
x64 (with sources, efi, boot and support folders)
x86 (with sources, efi, boot and support folders)
efi
boot
bootmgr.efi
bootmgr
setup.exe
autorun.inf
In the \x64\sources and \x86\sources folder were the boot.wim and install.esd files.
If you want to UEFI-boot, convert the ISO to a .imgPTN file using the MPI Tool Kit.
Clean Install
If you have a Win7/8 system and you want to do a clean install of Win10 - DO NOT DO IT until you have a valid Windows 10 Product Key for your system or have previously activated Win10 on your system (e.g. by upgrading your Win7SP1/8.1 system to Win10 first).
To perform a clean install, just copy the ISO to your E2B Removable Flash drive's \_ISO\WINDOWS\WIN10 folder.
If you have a Fixed-disk E2B drive, then convert the ISO to a .imgPTN file using MakePartImage (MPI_FAT32). This will give you a UEFI-bootable image as well as an MBR-bootable image (the Win10 Pro ISO I made was both 32-bit and 64-bit UEFI-bootable).
The difference betweeen Win10 and Win8 install ISOs is that Win10 allows you to skip the Product Key entry (with these ISOs) because there is only one Edition of Windows in the Install.wim file). This means that you do not need to pick any specific Product Key when installing it from an ISO with Easy2Boot.
You will however, need a Windows 10 Product Key to activate it if the system has never had an activated version of Win10 running on it before.
If however, you have previously upgraded to Win10 on that system and previously activated it on that same system, you can just 'Skip' the Product Key entry and Win10 will 'phone home' to activate itself because it already has your systems hardware 'fingerprint'. You can install Win10 onto a different hard drive in the same system and it will still activate, but you cannot change the mainboard.
For a method of doing a clean install without needing to first upgrade Windows, see this blog post.
The Windows 10 Product Key and Upgrading
You can upgrade directly from the ISO that you downloaded by mounting the ISO as a virtual drive and then run \Setup.exe from the mounted ISO. I think that Setup.exe detects if you are running Win7/8/8.1 and if so, it runs \sources\setupprep.exe. If \sources\setuprep.exe is not found or Win7/8/8.1 is not running, then the normal Setup clean install dialog is run instead of the Upgrade dialog boxes.
When you upgrade your system and activate Win10 (usually automatic), your system will 'phone home' and register your hardware profile with the MS licence servers.
If you later perform a clean install of Win10 using a generic install Product Key or your new Win10 Product Key (you can use ProduKey to find it), or choose the 'skip' option, your system will 'phone home' again and your hardware profile will match with the record on the MS licensing server and will automatically activate your new Win10 OS as long as it was previously activated successfully and is the correct Edition.
For more details see here.
P.S. 'Uros' has tried to upgrade Win 8.1 to Win10 where Win8.1 was on a VHD, but it seems Win10 blocks this and will not allow you to proceed.
For a method of doing a clean install without needing to first upgrade Windows, see this blog post.
Windows10 ToGo
Like Windows 8.1, Win10 will NOT run as a 'flat-file' install from a Removable USB flash drive (you get the everlasting spinning circle of dots with 'Getting ready' message and constant access to USB drive). To run Win10 ToGo, it must be run from within a VHD if using a Removable USB Flash drive.
So follow the same procedure as for Win8.1 and create a VHD file for Win10ToGo if using a Removable USB Flash drive. See the WinToUSB blog post here or the WinNTSetup blog post here.
P.S. WinToUSB does not like the Win10 ISO which has both x86 and x64 Editions in the same ISO (it crashes when you select the ISO!). This is fixed in the latest version of WinToUSB.
Note that if you install Win10ToGo Home onto a USB drive and boot it on any system which had previously contained an activated Win10 Home OS, then the WinToGo OS will automatically 'phone home' and activate. The same for Win10 Pro - as long as the system has been previously activated for the same Win10 OS.
OEM licences
Like Win8.1, Win10 OEM licences should never be sold separately.
Win10 OEM Product Keys will not activate on a Virtual Machine. If you want to run an activated copy of Win10 in a VM, use a full Retail licence or use a Win8 (not 8.1) OEM Product Key and upgrade to Win10 within the VM after installing Win8 (I have not personally tested this, but I believe it works for Win8-to-8.1 upgrades within a VM and so should work for Win10 too).
No comments:
Post a Comment